It's been a while since I logged in to my Createspace account. I uploaded my manuscript a few years ago and just left it hanging there. I didn't know how to market my book in different social media networks and find it hopeless to continue with the publishing.
Until recently, when I joined a group of young writers, who I find very enthusiastic in what they are doing. I asked myself why I didn't do before what they are doing now- write and write and write!
It made me think for a moment that it's not too late yet. Not too late to reopen my Createspace account and upload my revised manuscript. This time I am determined to move forward and do the best I can to market my book on Amazon and Kindle Publishing.
So this blog post will be about creating an account on Createspace and make your life, yes, you dear author, easier!
Some might be discouraged in the first few parts of the process because they have no idea what to do. I hope this post might help you in pursuing your dream to become international; your story to be internationally distributed.
Step by Step Guide to Createspace Self-Publishing
1. Make sure that you use an email address that you often check. Sign up and register at createspace.com.
 |
| Sign-up Page (Createspace IW101) |
Fill out the form completely.
 |
| Create My Account (Createspace IW101) |
 |
Member Agreement (Createspace IW101)
|
 |
| Verification (Createspace IW101) |
You will be asked to confirm your account in your email address. Go to Click here to Get Started link.
 |
| Click to Get Started (Createspace IW101) |
2. Once you clicked the link from your email, you will be redirected here. Since this will be your guide, you can ignore talking to a consultant. But if you feel like doing it, go ahead and ask away.
 |
| Set Up Your Book (Createspace IW101) |
3. If you have a ready manuscript in PDF/doc file, Start a new project. Enter the name/title of your manuscript and choose Paperback and then click on Get Started.
 |
| Start a New Project (Createspace IW101) |
4.
Fill out the Title Information form, leave it blank if you have nothing to declare. Make sure you write the author's name and the language used in your manuscript. Then click Save and Continue.
 |
| Title Information (Createspace IW101) |
5. ISBN is important because this will act as your manuscript barcode. Each title has a different ISBN. It stands for International Standard Book Number. Get your free ISBN on this page. After entering the title and ISBN has been provided, it can't be changed.
 |
ISBN (Createspace IW101)
|
 |
| ISBN Result (Createspace IW101) |
6. Interior. This is where you will upload the body of your book, from title page, table of contents, chapters to acknowledgments. Select the type of paper, color and size of the book you like. Size should be the same as the size of your body in MsWord, or any software you used in writing. Then upload your file and click Save.
 |
| Interior (Createspace IW101) |
Bleed only matters when there is an image or elements in your interior that extends in the margin. Click the second one for your manuscript without images. Honestly, I still don't understand this. Enlighten me if you can explain it better.
 |
| Interior Bleed (Createspace IW101) |
7. A book cover must be in PDF file if you already have one prepared. You can also use the book cover launcher, they have beautiful designs that suits your taste. Your back cover must be in text, so prepare for a synopsis of your story. You can also place About the Author at the back cover. Choose between Matte and Glossy cover.
 |
| Build Your Cover Online (Createspace IW101) |
 |
| Matte of Glossy Cover (Createspace IW101) |
Here are some of the designs in the Build Your Cover option:
 |
| Cover Designs (Createspace IW101) |
You can place an image and change the color of the spine. Spine is applicable on book with 100 pages and up. You can always go back on the previous setting if you wish to change the design.
 |
| Cover Options (Createspace IW101) |
Uploading your own book cover in PDF file should have at least 300dpi. If you don't know how to change the dpi of your image (jpg), there is a free online dpi converter available as well as a free jpg to pdf converter.
 |
| Upload Your PDF Cover (Createspace IW101) |
9. There you go, you have completed setting up your whole book. Wait for 24 hours after you click the Submit File for Review.
 |
| Submit File for Review (Createspace IW101) |
10. While waiting for the approval of File Review, you can set up the Distribution Channel wherein you can select all that is available. Your book can be purchased almost anywhere in the world. Click Save and Continue.
 |
| Distribution Channel (Createspace IW101) |
11. Pricing is the best part. You can go high or average in your royalties. It is up to you how much you think your book can sell as long as you set it above their production cost.
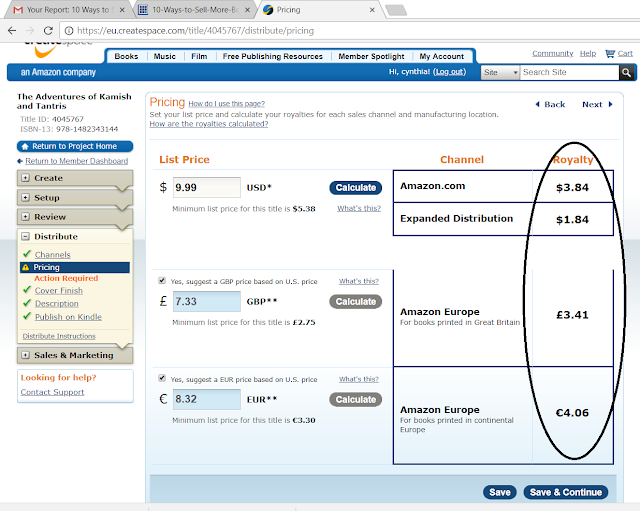 |
| Pricing (Createspace IW101) |
12. Choose again your Cover Finish. I don't know why they asked again.
 |
| Cover Finish (Createspace IW101) |
13. The Description of you book can be seen along with the book cover and price. Choose the category of your story, language used, your location and some keywords for easy searching of your book. There is also a portion where you tell readers about yourself. Bragging rights. Tell your accomplishments, your other books available and your interests. I love reading Author Biography, sometimes you can tell in their description that they are fond of supernatural things, or mystery or treasure hunting to come up with stories they created. It is good knowing there is somebody behind the story.
 |
| Description (Createspace IW101) |
14. The last thing on Createspace after approval of your File Review, and Proofing Your Book, is Publishing on Kindle. You can either export the Createspace file to Kindle or upload your ebook in Kindle format. There is a free help on this called Kindle Create. It will automatically adjust your settings and format so that it will be easy to read on Kindle tablet.
 |
| Publish on Kindle (Createspace IW101) |
15. Publishing on Kindle will redirect you to kdp.amazon.com as this platform is a separate publishing entity. Createspace is for paperback while Kindle is famous for ebook. Kindle Publishing has more earning opportunities that is why you have to send your book to KDP Select. If you already have an AMAZON.com account, you can use it here. If not, create a new account.
 |
| KDP (Createspace IW101) |
16. You can check the file that is being forwarded to Kindle, if you like the book set up, you don't have to change anything. Scroll every page to see if there are no breaks in the chapters.
 |
| Kindle Ready Book Cover (Createspace IW101) |
So, that's it. I hope this article helped you in self-publishing. Remember to set up your Account Settings especially in the Payment portion. You may apply a
Payoneer account here if you wish to receive a Direct Deposit (US account) even if you are not in the US.
If you are confused on some parts or want to know more, just ask in the comment section below, I will try to reply as soon as possible.
Thanks for reading this. Follow me by email for more updates.


 16. You can check the file that is being forwarded to Kindle, if you like the book set up, you don't have to change anything. Scroll every page to see if there are no breaks in the chapters.


No comments:
Post a Comment
Thanks for visiting my site. If you wish to receive updates please do subscribe on my email below or join my site. Have a great day!